Original:
Segmented:
Overlay:
Z:3
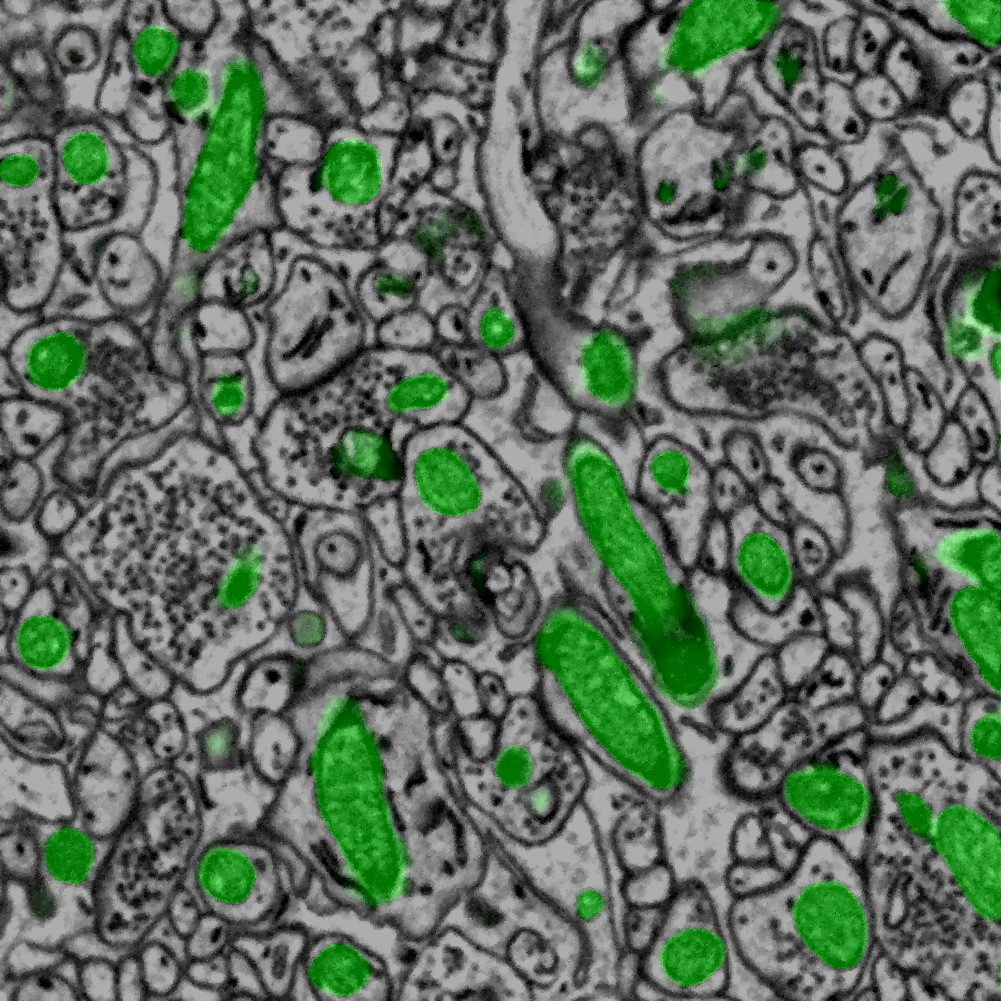
- Crop ID:6447
- Image source: CCDB_8192
- X location: 1576 pixels
- Y location: 403 pixels
- Width: 1000 pixels
- Height: 1000 pixels
- Training model: SBEM Mitochondria (denoised) (W9CDEEP3M50689)
- Augspeed: 1
- Frame: 1fm,3fm,5fm
- Submit time: 2020-03-24 17:00:43.495111
- Finish time: 2020-03-24 17:15:48.549101
- Original file location: https://cildata.crbs.ucsd.edu/ftp/data/telescience/home/CCDB_DATA_USER.portal/P2080/Experiment_8186/Subject_8188/Tissue_8190/Microscopy_8192/080309fl2_mo0cropcontadj.rec
Launch CDeep3M using Docker
Step 2) Pull the CDeep3M image
docker pull ncmir/cdeep3m
docker pull ncmir/cdeep3m
Step 3) Launch the docker container
docker run -it --network=host --gpus all --entrypoint /bin/bash ncmir/cdeep3m
docker run -it --network=host --gpus all --entrypoint /bin/bash ncmir/cdeep3m
Step 4) Download image:
wget https://cildata.crbs.ucsd.edu/ftp/data/telescience/home/CCDB_DATA_USER.portal/P2080/Experiment_8186/Subject_8188/Tissue_8190/Microscopy_8192/080309fl2_mo0cropcontadj.rec
Step 5) Create the input image folder:
mkdir tifs
Step 6) Convert the mrc file to TIFF images:
mrc2tif 080309fl2_mo0cropcontadj.rec tifs/image
Step 7) Download the trained model file:
wget https://doi.org/10.7295/W9CDEEP3M50689
Step 8) Untar the model file:
tar -xvf $MODEL_FILE
Step 9) Run the prediction process
runprediction.sh --augspeed 1 --models 1fm,3fm,5fm $MODEL_FOLDER $IMAGE_FOLDER ~/predictions
Launch CDeep3M using Singularity
Step 2) Download Singularity image file
wget https://doi.org/10.7295/W9CDEEP3M_SINGULARITY
Step 3) Launch the Singularity container
singularity shell --nv cdeep3m-docker.simg
Step 4) Download image:
wget https://cildata.crbs.ucsd.edu/ftp/data/telescience/home/CCDB_DATA_USER.portal/P2080/Experiment_8186/Subject_8188/Tissue_8190/Microscopy_8192/080309fl2_mo0cropcontadj.rec
Step 5) Create the input image folder:
mkdir tifs
Step 6) Convert the mrc file to TIFF images:
mrc2tif 080309fl2_mo0cropcontadj.rec tifs/image
Step 7) Download the trained model file:
wget https://doi.org/10.7295/W9CDEEP3M50689
Step 8) Untar the model file:
tar -xvf $MODEL_FILE
Step 9) Run the prediction process
runprediction.sh --augspeed 1 --models 1fm,3fm,5fm $MODEL_FOLDER $IMAGE_FOLDER ~/predictions
Launch CDeep3M on the AWS cloud

Step 1) Launch the docker container on AWS
docker run -it --network=host --gpus all --entrypoint /bin/bash ncmir/cdeep3m
Step 2) Download the trained model file:
wget https://doi.org/10.7295/W9CDEEP3M50689
Step 3) Untar the model file:
tar -xvf $MODEL_FILE
Step 4) Download image:
wget https://cildata.crbs.ucsd.edu/ftp/data/telescience/home/CCDB_DATA_USER.portal/P2080/Experiment_8186/Subject_8188/Tissue_8190/Microscopy_8192/080309fl2_mo0cropcontadj.rec
Step 5) Create the input image folder:
mkdir tifs
Step 6) Convert the mrc file to TIFF images:
mrc2tif 080309fl2_mo0cropcontadj.rec tifs/image
Step 7) Run the prediction process
runprediction.sh --augspeed 1 --models 1fm,3fm,5fm $MODEL_FOLDER $IMAGE_FOLDER ~/predictions
CDeep3M-Colab Prediction GUI
Run CDeep3M predictions with a graphical user interface (GUI) on Google Colab's free GPUs.
CDeep3M-Colab CLI
If you are comfortable using a command line interface, this provides the most flexible way to use all functionality of CDeep3M while using Googles free GPUs. It performs the complete CDeep3M installation and sets you up with the CDeep3M CLI on colab.